


 智算多多
智算多多联系我们


关注我们

公众号

视频号
隐私协议用户协议
◎ 2025 北京智算多多科技有限公司版权所有京ICP备 2025150592号-1
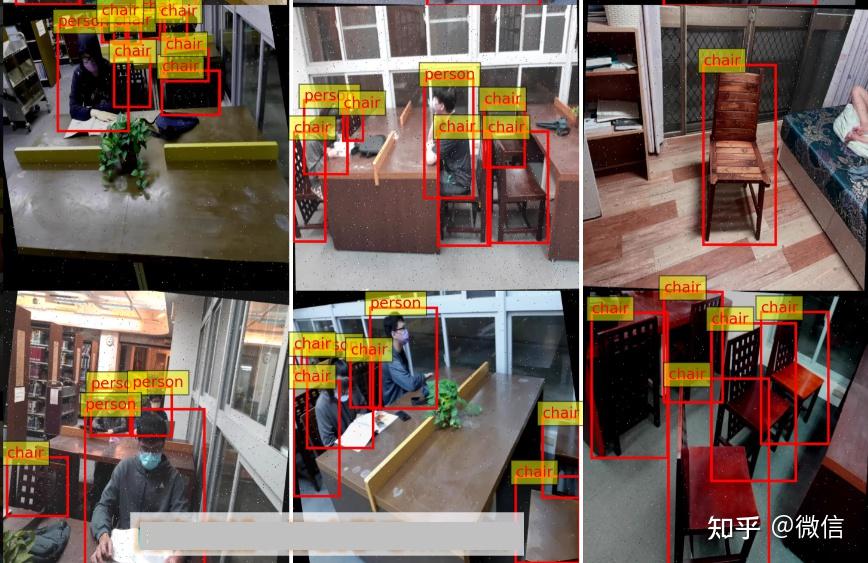
数据集包含2568张图像,提供YOLO和VOC两种标注方式,共2类。标注数量如下:
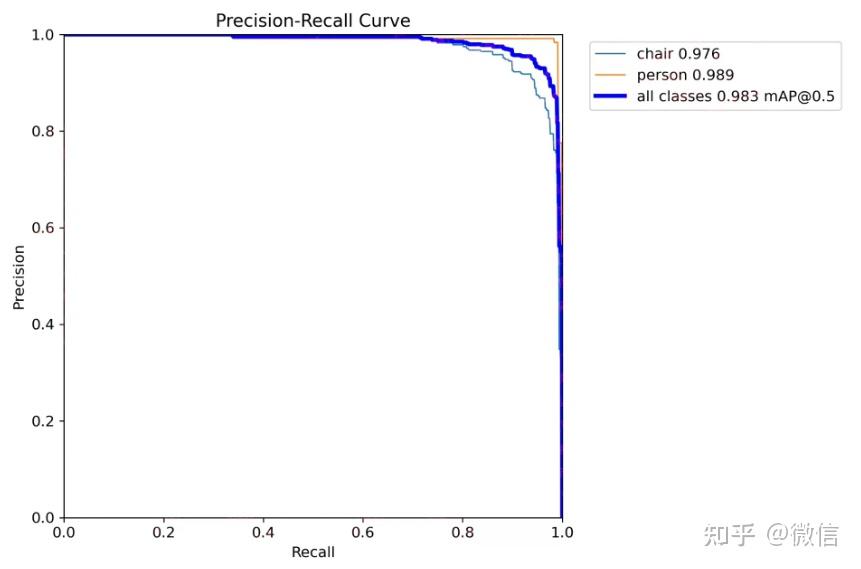
模型训练使用yolov11n训练,30个epoch训练结果,mAP如描述图所示。
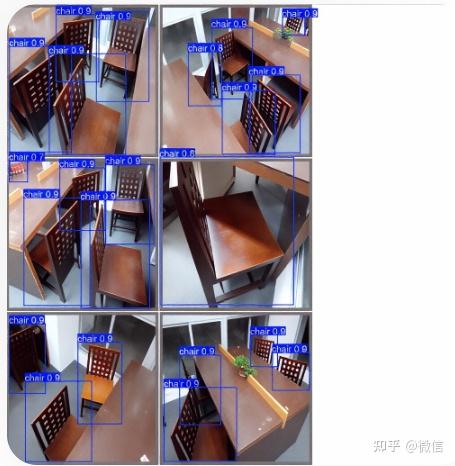
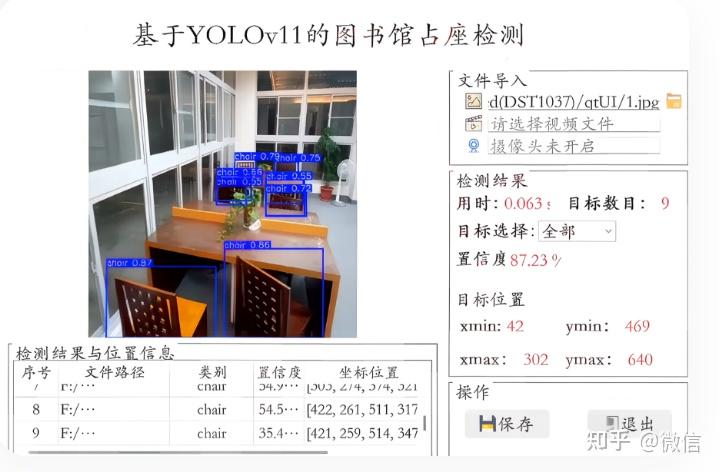
运行界面采用Qt编写,本项目已经训练好模型,配置好环境后可直接使用,运行效果见描述图像。
| 类别 | 内容 |
|---|---|
| 系统名称 | 基于YOLOv11的图书馆占座检测系统 |
| 核心算法 | YOLOv11n (Ultralytics) |
| 检测任务 | 图书馆座位占用状态检测 |
| 检测类别 (共2类) | chair (座位) person (人) |
| 数据集规模 | 总计 2568 张图像 |
| 标注数量 | chair: 7434 个 person: 3016 个 |
| 标注格式 | 提供 YOLO (.txt) 和 VOC (.xml) 两种格式 |
| 模型性能 | mAP@0.5: 0.983 chair AP: 0.976 person AP: 0.989 |
| 训练配置 | Epochs: 30 模型: yolov11n.pt |
| 用户界面 | 基于 PyQt5 开发的图形化界面 |
| 系统功能 |
|
以下是构建该系统的完整代码,分为两部分:模型训练代码和Qt界面代码。
train.py) 此代码用于训练YOLOv11n模型。请确保您的数据集已按以下结构组织,并创建了data.yaml文件。
数据集结构示例:
library_dataset/
├── images/
│   ├── train/
│   └── val/
├── labels/
│   ├── train/
│   └── val/
└── data.yaml
data.yaml 文件内容:
# data.yaml
path: ./library_dataset  # 数据集根目录
train: images/train      # 训练集图片路径
val: images/val          # 验证集图片路径

# 类别数量
nc: 2

# 类别名称
names:
  0: chair
  1: person
train.py 代码:
from ultralytics import YOLO

def train_library_model():
    """
    使用 YOLOv11n 训练图书馆占座检测模型
    """
    # 1. 加载预训练模型
    model = YOLO('yolov11n.pt')  # 加载 YOLOv11n 预训练权重

    # 2. 开始训练
    results = model.train(
        data='library_dataset/data.yaml',  # 数据配置文件路径
        epochs=30,                         # 训练轮数
        imgsz=640,                         # 输入图像尺寸
        batch=16,                          # 批大小,根据显存调整
        name='library_occupancy_v11n',     # 训练任务名称
        project='runs/train',              # 项目保存目录
        exist_ok=True,                     # 允许覆盖已有实验
        patience=5,                        # 早停耐心值
        device=0                           # 使用GPU 0,若使用CPU则设为 'cpu'
    )

    print("训练完成!")
    print(f"最佳模型保存在: {results.save_dir}/weights/best.pt")

if __name__ == "__main__":
    train_library_model()
main_window.py) 此代码使用PyQt5创建图形界面,实现图片/视频检测、摄像头实时检测及结果显示功能。请确保已安装PyQt5和opencv-python。
import sys
import os
import time
import cv2
import torch
from PyQt5.QtWidgets import (QApplication, QMainWindow, QWidget, QVBoxLayout,
                             QHBoxLayout, QLabel, QPushButton, QFileDialog,
                             QComboBox, QTableWidget, QTableWidgetItem, QMessageBox)
from PyQt5.QtGui import QPixmap, QImage, QFont
from PyQt5.QtCore import Qt, QTimer, QThread, pyqtSignal
from ultralytics import YOLO

# --- 检测线程 ---
class DetectionThread(QThread):
    # 信号用于更新UI
    frame_processed = pyqtSignal(QImage, list, float)
    finished = pyqtSignal()

    def __init__(self, model, source=0):
        super().__init__()
        self.model = model
        self.source = source  # 0 for webcam, or file path
        self.running = True

    def run(self):
        cap = cv2.VideoCapture(self.source)
        while self.running and cap.isOpened():
            ret, frame = cap.read()
            if not ret:
                break

            start_time = time.time()
            # 进行推理
            results = self.model(frame)
            infer_time = time.time() - start_time

            # 解析结果
            detections = []
            annotated_frame = results[0].plot()  # 获取带标注的帧
            for box in results[0].boxes:
                cls_id = int(box.cls[0])
                conf = float(box.conf[0])
                xyxy = box.xyxy[0].tolist()
                detections.append({
                    'class': self.model.names[cls_id],
                    'confidence': conf,
                    'coordinates': xyxy
                })

            # 转换颜色格式 (BGR -> RGB)
            rgb_image = cv2.cvtColor(annotated_frame, cv2.COLOR_BGR2RGB)
            h, w, ch = rgb_image.shape
            bytes_per_line = ch * w
            qt_image = QImage(rgb_image.data, w, h, bytes_per_line, QImage.Format_RGB888)

            # 发送信号
            self.frame_processed.emit(qt_image, detections, infer_time)

        cap.release()
        self.finished.emit()

    def stop(self):
        self.running = False
        self.wait()


# --- 主窗口 ---
class MainWindow(QMainWindow):
    def __init__(self):
        super().__init__()
        self.setWindowTitle("基于YOLOv11的图书馆占座检测")
        self.setGeometry(100, 100, 1200, 800)

        # 加载模型
        self.model = YOLO('runs/train/library_occupancy_v11n/weights/best.pt') # 请确保路径正确

        self.init_ui()
        self.detection_thread = None

    def init_ui(self):
        # --- 主布局 ---
        central_widget = QWidget()
        self.setCentralWidget(central_widget)
        main_layout = QHBoxLayout(central_widget)

        # --- 左侧:图像显示区域 ---
        left_layout = QVBoxLayout()
        self.image_label = QLabel("等待输入...")
        self.image_label.setAlignment(Qt.AlignCenter)
        self.image_label.setMinimumSize(640, 480)
        self.image_label.setStyleSheet("QLabel { background-color : lightgray; }")
        left_layout.addWidget(self.image_label)

        # --- 右侧:控制面板 ---
        right_layout = QVBoxLayout()

        # 文件导入
        file_group = QLabel("文件导入")
        file_group.setFont(QFont("Arial", 12, QFont.Bold))
        right_layout.addWidget(file_group)

        self.file_path_label = QLabel("d(DST1037)/qtUI/1.jpg")
        right_layout.addWidget(self.file_path_label)

        self.btn_select_video = QPushButton("请选择视频文件")
        self.btn_select_video.clicked.connect(self.select_video)
        right_layout.addWidget(self.btn_select_video)

        self.btn_webcam = QPushButton("摄像头未开启")
        self.btn_webcam.clicked.connect(self.toggle_webcam)
        right_layout.addWidget(self.btn_webcam)

        # 检测结果
        result_group = QLabel("检测结果")
        result_group.setFont(QFont("Arial", 12, QFont.Bold))
        right_layout.addWidget(result_group)

        self.time_label = QLabel("用时: 0.000s")
        self.count_label = QLabel("目标数目: 0")
        self.target_combo = QComboBox()
        self.target_combo.addItems(["全部", "chair", "person"])
        self.conf_label = QLabel("置信度: 0.00%")

        right_layout.addWidget(self.time_label)
        right_layout.addWidget(self.count_label)
        right_layout.addWidget(self.target_combo)
        right_layout.addWidget(self.conf_label)

        # 目标位置
        position_group = QLabel("目标位置")
        position_group.setFont(QFont("Arial", 12, QFont.Bold))
        right_layout.addWidget(position_group)

        self.xmin_label = QLabel("xmin: 0")
        self.ymin_label = QLabel("ymin: 0")
        self.xmax_label = QLabel("xmax: 0")
        self.ymax_label = QLabel("ymax: 0")

        right_layout.addWidget(self.xmin_label)
        right_layout.addWidget(self.ymin_label)
        right_layout.addWidget(self.xmax_label)
        right_layout.addWidget(self.ymax_label)

        # 操作按钮
        action_group = QLabel("操作")
        action_group.setFont(QFont("Arial", 12, QFont.Bold))
        right_layout.addWidget(action_group)

        self.btn_save = QPushButton("保存")
        self.btn_exit = QPushButton("退出")
        self.btn_exit.clicked.connect(self.close)

        btn_layout = QHBoxLayout()
        btn_layout.addWidget(self.btn_save)
        btn_layout.addWidget(self.btn_exit)
        right_layout.addLayout(btn_layout)

        # --- 底部:检测结果表格 ---
        self.table = QTableWidget()
        self.table.setColumnCount(5)
        self.table.setHorizontalHeaderLabels(["序号", "文件路径", "类别", "置信度", "坐标位置"])
        main_layout.addLayout(left_layout, 70)
        main_layout.addLayout(right_layout, 30)
        main_layout.addWidget(self.table)

    def select_video(self):
        file_path, _ = QFileDialog.getOpenFileName(self, "选择视频文件", "", "Video Files (*.mp4 *.avi *.mov)")
        if file_path:
            self.file_path_label.setText(file_path)
            self.start_detection(file_path)

    def toggle_webcam(self):
        if self.detection_thread and self.detection_thread.isRunning():
            self.detection_thread.stop()
            self.btn_webcam.setText("摄像头未开启")
        else:
            self.start_detection(0)
            self.btn_webcam.setText("摄像头已开启")

    def start_detection(self, source):
        if self.detection_thread and self.detection_thread.isRunning():
            self.detection_thread.stop()

        self.detection_thread = DetectionThread(self.model, source)
        self.detection_thread.frame_processed.connect(self.update_frame)
        self.detection_thread.finished.connect(self.on_detection_finished)
        self.detection_thread.start()

    def update_frame(self, qt_image, detections, infer_time):
        # 更新图像
        pixmap = QPixmap.fromImage(qt_image)
        self.image_label.setPixmap(pixmap.scaled(self.image_label.size(), Qt.KeepAspectRatio))

        # 更新检测结果
        self.time_label.setText(f"用时: {infer_time:.3f}s")
        self.count_label.setText(f"目标数目: {len(detections)}")

        # 更新置信度 (显示所有目标的平均置信度)
        if detections:
            avg_conf = sum(d['confidence'] for d in detections) / len(detections)
            self.conf_label.setText(f"置信度: {avg_conf:.2%}")
        else:
            self.conf_label.setText("置信度: 0.00%")

        # 更新表格
        self.table.setRowCount(len(detections))
        for i, det in enumerate(detections):
            self.table.setItem(i, 0, QTableWidgetItem(str(i + 1)))
            self.table.setItem(i, 1, QTableWidgetItem(self.file_path_label.text()))
            self.table.setItem(i, 2, QTableWidgetItem(det['class']))
            self.table.setItem(i, 3, QTableWidgetItem(f"{det['confidence']:.2%}"))
            coords = [int(x) for x in det['coordinates']]
            self.table.setItem(i, 4, QTableWidgetItem(str(coords)))

            # 如果有检测结果,更新位置信息(显示第一个检测到的目标)
            if i == 0:
                self.xmin_label.setText(f"xmin: {coords[0]}")
                self.ymin_label.setText(f"ymin: {coords[1]}")
                self.xmax_label.setText(f"xmax: {coords[2]}")
                self.ymax_label.setText(f"ymax: {coords[3]}")

    def on_detection_finished(self):
        self.btn_webcam.setText("摄像头未开启")
        QMessageBox.information(self, "提示", "视频播放完毕或摄像头已停止。")

    def closeEvent(self, event):
        if self.detection_thread and self.detection_thread.isRunning():
            self.detection_thread.stop()
        event.accept()

if __name__ == "__main__":
    app = QApplication(sys.argv)
    window = MainWindow()
    window.show()
    sys.exit(app.exec_())
data.yaml 文件。train.py 脚本。runs/train/library_occupancy_v11n/weights/best.pt。main_window.py 中的模型路径 self.model = YOLO('...') 指向您训练好的 best.pt 文件。main_window.py 即可启动图形界面。智算多多